Custom Longarm Machine Quilting

Saturday, June 9, 2012

Bliss Quilt

Last fall I did this quilt for one of my Twitter friends. Isn't it gorgeous?! I've had the pleasure of knowing Tammy of Karamat Designs for a while, but in October I got to meet her in person. It's always fun to meet your online friends in real life. :)

For this quilt I did small flowers in the 4-patches, and larger flowers in the 16-patches. In the sashing around the 4-patch blocks and the setting triangles I quilted a continuous loop.


In the inner border I quilted leaves and flowers, and in the outer border I quilted a large fern design.
Here's a better view of the quilting in the blocks from the back. It looks pretty cool.
And a view of the borders from the back.

Friday, June 8, 2012

Stars

A while ago I quilted this fun quilt for one of my clients. Can you believe that she bought this top at a yard sale? It amazes me that someone would sell this for only a few dollars.

In the background I quilted a tight filler, inspired by the McTavishing technique. This technique is great when you want to give the illusion of sky or water.
In the stars I just quilted in the ditch, and then did 1/4 inch quilting inside the blue border. (The blue fabric strip on the outside is the binding. I frequently have clients ask me to attach the binding for them and/or finish the binding by hand.)

Thursday, June 7, 2012

Outfox the Fox

I know I'm a little late getting these posts up, but better late than never, right?

Last summer/fall I quilted two quilts for Lizzy House, an amazing fabric designer. She was releasing her fabric line, Outfoxed, along with some corresponding patterns.  I had so much fun quilting her quilts.

The first quilt I did was for her pattern, Outfox the Fox! You can purchase it here, in her online store.


In each of the puzzle pieces I quilted a different geometric design: horizontal, vertical, diagonal lines, and circles.

In the background I quilted concentric rectangles, 1/2 inch apart.
Here's a close-up shot of the background. Doesn't it look so cool?
I also quilted the Colorist for her. You can read more about that one here.

The Colorist

As promised, here is the post about the second quilt I quilted for Lizzy House. This is her quilt, The Colorist. I absolutely love this quilt. It's a color circle. I just did one in all solids and it looks really cool, but more about that later when it gets finished. (You can buy the pattern here, though, if you want to make your own. It's a fairly easy pattern. The trickiest part is putting the whole thing together, because you are sewing basically a giant circle. But it turns out looking great!)

For this quilt I quilted concentric circles. In the outer background they are 1/2 inch apart, and in the inner sashing piece and inner circle they are 1/4 inch apart.

In each of the color pieces I quilted vertical lines.

In case you missed my previous post, you can see how I quilted her other quilt, Outfox the Fox, here.

Sunday, February 19, 2012

Price Change Notice

Please note that due to the rising costs of cotton, my wholesaler has raised the price of batting.  It is now $7.99 per yard, effective February 3, 2012.

Mike's T-Shirt Quilt

I've been working on a t-shirt quilt for my husband for what seems like years (probably because it has been years!).  I finally got it done this past week.  He's so excited to have a quilt big enough (he always says that the quilts I make us aren't long enough to cover his feet.  I don't know what he's complaining about.  They cover mine just fine!).  It ended up being about 72 x 90.

I gathered up all of his old, random t-shirts to make the quilt.  I used a solid grey minkee on the back, and bound it with a black/grey swirl print.

I quilted the quilt with a tight overall meander.  I outlined certain parts of the designs on some of the t-shirts, and then stitched words or images into some of the blocks.  For example, on his "No I will not fix your computer" t-shirt, I quilted a desktop computer.  And, on his Verizon Wireless t-shirt I quilted "Can you hear me now?"

It turned out way bigger than I expected.  When I laid it out on our bed to take a picture of it, I was surprised by how large it is.
But, it turned out great, and Mike is super excited to use it.

I used Superior Threads monopoly clear on the top, and Superior Threads So Fine! Smoke (a grey colored thread) in the bobbin.

Monday, January 23, 2012

Honey Bun Quilt Idea

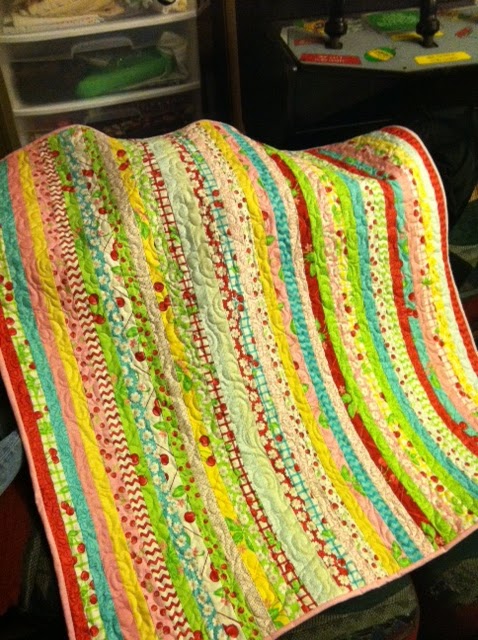
Last summer/fall when I was going through my extremely large (and out of control) fabric stash, I found a Honey Bun that I had NO idea where it came from.

I don't particularly purchase Honey Buns.  I'm more of a Jelly Roll/Charm Pack/Layer Cake kinda gal.  What is a Honey Bun?  It's a roll of 1.5 inch strips of fabrics from a single line.  This particular Honey Bun was from "Oh Cherry Oh" by Me & My Sister for Moda.

So, since I didn't remember buying it, and I had no idea what to do with it, it sat on my sewing table, unrolled, for about two weeks.  Then, suddenly, it hit me.  I was having a baby girl in a few months and if I sewed the strips together it would be the perfect size for a baby quilt.

Like most of my own personal projects, it's been sitting at the shop waiting for its turn on the quilt machine for a while now.  I finally got some time last Saturday to quilt for myself (I'm still technically on maternity leave until Tuesday, but I just couldn't help it! I had to quilt something!) so I threw this on and quilted it up.  I used a light pink colored thread (So Fine! It's a Girl!) and quilted an all-over flower design.  It turned out really great.  I got it bound later that night and in the wash, and my baby girl was able to use it over the weekend.